BTemplates.com

Search This Blog

Showing posts with label Operating System. Show all posts

Sunday, 26 July 2015

How To Unhide Hidden File-Folder On USB


When your folders go missing on your computer or your storage device, or simply created shortcuts in each of them, then they are infected with a virus, actually not a virus. So let's get to know how to get rid of it..


Step 1:
Open the Command Prompt. You can find it under "Accessories" or just search for "CMD" on search bar of your Windows computer.

Step 2:
Find out in what drive of your computer the virus/shortcut are located. Go to My Computer (for Windows 7 or below) or This PC; you'll notice the C, D, E, etc drives.

Step 3:
Go to CMD and type in the commands.

For example, the virus is located in "F" drive, then just type <attrib -h -r -s /s /d f:\*.*, the F beside the D is your drive; simply change it to where drive the virus is located.
  • -h: to unhide all files on drive W
  • -r: create the files in drive W is free of read-only attribute.
  • -s: making all files on drive W to be not part of the system again, so easy in the clear
  • f: w drive
  • *. *: All files ending in
Step 4:
Press Enter. The bigger the files, the longer the processing takes. Wait until you see "C\:Users.." again. It means that drive will unhide all the folders in your drive.

Step 5:
Check your drive again. The folders are now retrieved together with the shortcut viruses. Remove unnecessary files, the shortcut files that are not supposed to be there. You might find autorun.inf or desktop.ini; simply delete them.


How to create a recovery media for Ubuntu 12.04 LTS installed on DU laptops


Delhi University has given Laptops to the 1st year students so that they may use it for their studies. These are having a pre-installed Ubuntu 12.04 LTS operating system on it. This OS is far more different from Windows OS although both the OSes have a GUI (Graphical User Interface). If you want to install Windows OS, you can also do it. The Whole procedure is discussed in the link given right here.


With this Laptop no DVD/CD reader-writer is available. So here is discussed how to create a backup image of present Ubuntu OS to recover the Laptop to factory state by using pendrive. So it starts with creating a backup image (.ios file).

This is how your home screen look like.


Step 1:
Goto Dash Home and type Startup Disk Creator and open the application.

Step 2:
A dialog box will appear. Here click on OK.

Step 3:
It will ask you to choose a location to save the iso file. You can select any location. Let’s select Desktop and click choose.

Step 4:
It’s almost done. Wait for a while.

Step 5:
The backup file is created as HP_Recovery on the desktop.

Step 6:
Now create a Bootable USB Stick with this image (iso file). Now you can easily reinstall Ubuntu 12.04 LTS using this USB Sick if you installed any other OS on this laptop.

Related: How To Make Bootable USB Stick

Saturday, 25 July 2015

How To Install OS From Pendrive


In order to install any operating system through pendrive you need to make it(pendrive) bootable by writing the required files to install OS. You can use either .iso or .nrg file format images. Here in this post .iso file has been used for demonstration. There are various software tools which can be used to burn the image file to the pendrive. But using any random tool can be hazardous as they might left your USB stick with permanent memory loss i.e. you might not be able to use your pendrive for data storage further.
 
Here is demonstrated Power ISO. Don't worry this is a trusted software and won’t cause any memory loss to your pendrive. You can download it from Power ISO official site or you may simply click the links given below.
Here step-by-step procedure is explained with screenshoots. Even if you find any difficulty then feel free to contact us or you can just drop a comment.
So here we go.
Step 1:
Plug-in your Pendrive.
Step 2:
Open PowerISO in administrator mode. For this right-click on PowerISO icon and select Run as adminstrator.
Step 3:
Goto Tools option in the menu bar and select Create Bootable USB Drive.

Step 4:
A dialog box will be as in image below.

Step 5:
Here select Image Source File, Destination Derive and Write Method. Finally click Start. It will take some time to get yours' usb stick ready. So wait until the writing/burning process get finished. Then click OK.
Step 6:
Now you need to change the boot priority in the BIOS. You need to set the 1st booting device as USB HDD, save the changes made and then restart your system.
Note: If your system is not booting from usb stick then following may be the possible reasons
  • Check whether you have selected proper booting media in BIOS settings. It is recommended to select USB-HDD as 1st booting device.
  • The usb stick is not made bootable correctly even if the Image file of OS (or any other tool) is written in its memory.


Friday, 24 July 2015

How to Remove Shortcut Virus on Windows


When your folders go missing on your computer or your storage device, or simply created shortcuts in each of them, then they are infected with a virus, actually not a virus. So let's get to know how to get rid of it..


Step 1:
Open the Command Prompt. You can find it under "Accessories" or just search for "CMD" on search bar of your Windows computer.

Step 2:
Find out in what drive of your computer the virus/shortcut are located. Go to My Computer (for Windows 7 or below) or This PC; you'll notice the C, D, E, etc drives.

Step 3:
Go to CMD and type in the commands.

For example, the virus is located in "F" drive, then just type <attrib -h -r -s /s /d f:\*.*, the F beside the D is your drive; simply change it to where drive the virus is located.
  • -h: to unhide all files on drive W
  • -r: create the files in drive W is free of read-only attribute.
  • -s: making all files on drive W to be not part of the system again, so easy in the clear
  • f: w drive
  • *. *: All files ending in
Step 4:
Press Enter. The bigger the files, the longer the processing takes. Wait until you see "C\:Users.." again. It means that drive will unhide all the folders in your drive.

Step 5:
Check your drive again. The folders are now retrieved together with the shortcut viruses. Remove unnecessary files, the shortcut files that are not supposed to be there. You might find autorun.inf or desktop.ini; simply delete them.


Tuesday, 21 July 2015

SysKey-SAM Lock Tool


The SysKey utility, also called the SAM lock tool, is a built-in Windows tool that allows you to secure the Security Accounts Management (SAM) Database. It can be helpful for preventing hackers from cracking Windows passwords.


I will first show you what you can do with the SysKey utility and then discuss how much extra security SysKey protection really brings.

The SAM database is part of the Windows Registry and stores information about user accounts such as user names and password hashes. The corresponding Registry file is located in c:\windows\system32\config. Since Windows NT 4 SP3, the SAM file is partly encrypted. The SysKey utility allows you to move the SAM encryption key off the computer and/or configure a startup password.

Using the SysKey utility

To launch the SysKey utility, type “syskey” at the Start Search prompt of Windows Vista or Windows 7, or use the “run” option of the Windows XP Start Menu.
SysKey

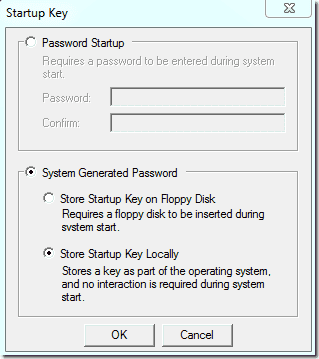
To move the SAM encryption key off the computer, you have, click “Store Startup Key on Floppy Disk.” The tool claims that you will need to insert a floppy disk on startup, which is not really true. Modern computers no longer have floppies, and this storage medium isn’t reliable enough anyway. You can also store the SAM encryption key on a USB flash drive.
Configure Ssyskey

However, the USB stick has to be mounted on drive “A:”. You can assign this drive letter to your thumb drive in Windows Disk Management. If the drive letter A is not available, you have to first disable the floppy disk in the computer BIOS.

The SysKey utility will then allow you to store a file with the name StartKey.Key on your USB drive. This file contains the SAM encryption key. Without it, you won’t be able to log on in the future. Thus, whenever you boot up your computer, you have to insert this USB stick. Windows will always automatically load the encryption key from drive A:, and if you set a password with the SysKey utility, you will have to enter this password whenever you boot up the computer.
SysKey startup key SysKey Startup password

What extra security does the SysKey utility bring

First of all, neither storing the SAM encryption key on an external drive nor protecting it with a password can prevent tools such Kon-Boot or the Trinity Rescue Kit from manipulating the SAM database. These tools are still able to set an empty password on all accounts. However, after such a manipulation, it is not possible to boot up Windows without the encryption key on the USB drive or without the startup password.

Hence, this method will prevent the majority of wannabe hackers from logging on to the computer with administrator privileges. It won’t, however, stop real hackers. As long as an attacker has physical access to an unencrypted system drive, everything is doable. If you secure the SAM encryption key then an attacker wouldn’t be able to reach the logon screen without access to the encryption key.

So does it make sense to protect all your PCs with the SysKey utility? I don’t think so. The fact that the tool tries to store the encryption key on a floppy disk shows that this method is a bit outdated. It is too much hassle for your users to mess with a USB stick or to use an additional password compared to the extra protection the tool offers.

However, I think, the SysKey utility is still useful in some environments. For instance, you can use the tool to protect laptops or servers where you don’t want to disable booting from external drives or where many people would have the time to open the PC and access the system drive. It might also make sense to protect your own PC this way. Wouldn’t it be embarrassing if your colleague’s eight-year-old daughter hacks your PC while you take a coffee break?

The point is that 99% of all kids out there who call themselves hackers know about Kon-Boot and the myriad of similar tools, but they don’t know how to handle SysKey. SysKey was originally introduced to prevent hackers from cracking passwords in the SAM database with brute force attacks. And popular hacking tools such SAMInside still can’t handle a protected SAM encryption key.

Speed-up Windows OS


It happens with most of us that our systems becomes slow and show lagging while opening applications and running various processes. So here is discussed some important things in detail which help your PC give optimal performance.


1. Remove unnecessary startup objects.

2. Defragment hard disk.

3. Scan hard disk for errors.

4. Disk clean-up & Remove temporary files.

5. Scan for viruses regularly.

6. Check spyware & adware.

7. Uninstall unnecessary programs.

8. Check for registry errors.

9. Remove unnecessary running processes and services from running.

10. Adjust Virtual Effects.

11. Enable Hibernate.

12. Increase Virtual Memory.


Remove unnecessary start up objects:
  • Open run dialog box with windows key + r and type msconfig and press enter. Goto Startup tab. Here you will find a list of startup objects. Keep only necessary objects and disable rest of them.
  • Else press ctrl + shift + esc. It will open task manager and here also you can goto startup tab.

Defragment hard disk:
  • Our hard disk data wont saved sequentially. So we need to defragment it to decrease the seek time of your hard disk.
  • Goto: My Computer-> Select drive-> Right click-> Properties-> Tools
  • Chose Defragment or Optimise (You will see any one of the two)
  • Select drive and chose Defragment or Optmise

Scanning hard disk for errors:
  • This action recovers bad sectors and fixes file system errors.
  • Goto: My Computer-> Select drive-> Right click-> properties-> Tools-> Check.

Disk Cleanup & Remove temp files:
  • We perform this step for removing temporary files.
  • Goto RUN type %temp% and press enter then delete all files,
  • Goto RUN and type Prefetch and press enter then delete all files.
  • Instead of the above steps you can also use Disk Cleanup and for that Goto: My Computer-> Select drive-> Right click-> Properties-> General-> Disk Cleanup

Scan for viruses regularly:
  • Update your antivirus and scan for Viruses and Trojans regularly.

Check spyware &Adware:
  • Download antispyware and adware tools and check your system. Using these softwares could slow down your internet speed.

Uninstall unnecessary programs:
  • It’s better to uninstall softwares which you don’t use any more.

Check for registry errors:
  • Download Registry error checking tools like tune-up utilities and scan for registry errors.

Remove unnecessary running processes and services from running:
  • Use Process Explorer or task manager and remove processes which are not using.

Adjust Visual Effects:
  • Right click on My Computer-> Properties-> Advances System Settings-> Advanced-> Setting tab under Performance-> Select Best Performance or Best Appearance as per your requirement.

Enable Hibernate:
  • Use Hibernate instead of Shutdown. It is 10 times faster in switching on your system with previous state before you used your PC.
  • Goto: Control panel-> Power options-> chose what do power buttons do-> Select Hibernate.

Increase Virtual Memory:
  • Virtual memory works like extended RAM. So it helps to increase speed of your applications.
  • For this: Right click on My computer-> properties-> Advanced System Settings-> Advanced-> Setting tab under performance-> Advanced-> Change.
  • It’s better to set 2-3 times of your RAM size.

Tuesday, 7 July 2015

Windows 10 Technical Preview


Microsoft, instead of launching Windows 9, has launched Preview of Windows 10 Operating System. In this OS, various new features are added. This new operating system will be available in market by the middle of 2015. Let's know what's new you will be getting in Windows 10.

It was hoped from last few days, Microsoft would launch Windows 9 as its new Operating System. But recently the company has launched Windows 10 Preview instead of Windows 9. Microsoft launched Windows 8 operating system about 2 years back, but it could not get much success. Now Windows 10 is designed in such a way that it can run on mobile phones, tablets, and personal computers easily. Yet the company has launched Preview of new OS, it is expected that it will be available in market by July 2015. The new OS is built with various features which users were missing in Windows 8. From phones to the gaming console, it can run on different devices.

START MENU RETURNS: In the new OS you will be getting Start Menu again. Actually, Microsoft removed Start Menu in Windows 8, but users didn't like this change. This time Microsoft took a U-turn and added Start Menu in its new OS again. Similar to Windows 7, Start Menu is given on bottom-left corner on the desktop in Windows 10. Users will get Touch experience like Windows 8.1 operating system. Instead, users will also be having an option to give a similar look as that of windows 7 to the new OS. Actually, Windows 10 is a combination of the classic look of Windows 7 and modern user interface. In this new OS, you can also change the layout.

UNIVERSAL APPS: Microsoft's new OS will also support apps. Means users of Windows 10 Operating System can use all the apps of Windows store. These apps will also run on your desktop. You can also re-size these apps as per your choice. Besides this, new OS will also support older apps available on app store. Important functions can be accessed with Context Menu. Generally, the meaning of Windows Universal App is that all your apps can run on Windows 10 devices(desktop, phones, and gaming console).

VIRTUAL DESKTOP: Microsoft has given an option of Virtual Desktop for Enterprises and Power users. You can switch different desktop as per your need with the help of Virtual Desktop. This will appear very similar to Virtual Desktop. Users can have different desktops for different projects and file according to their convenience. This feature is inbuilt in Windows 10. Further, you can have an overview of all running apps with the help of task-view and can move to the virtual desktop and manage them easily. This is like adding more screens to your phone or tablet which can be viewed by swiping.

TASK VIEW: To improve multitasking in this new OS, Task-View Button (alt-tab) is given. Task-View button is integrated on the taskbar and can be used for switching to different apps on Virtual Desktop. Diminished preview of all the open apps can be seen together.

CONTINUUM: This is the most interesting feature of Windows 10. This feature is for 2 in 1 devices. Actually, Continuum feature means that the user interface of new OS will change automatically according to the device. For example, suppose you are using a Hybrid Laptop-Tablet then you will be having a standard desktop, but as soon as you unplug the keyboard, it will switch to Tablet mode. This time it has come up with Touch Button.

NO METRO AAPS: Windows 10 also doesn't have large tiles on Home Screen like other versions of Windows. You can manage your items or can apply a background picture of your choice. You can switch from Tablet mode to Touch Screen mode without  keyboard and mouse. The Charms Bars of Windows 8 haven't been removed completely. Instead, these are improved. Windows 8 users, who are already familiar with this feature can further use it.

IMPROVED SNAP: Snap function has been improved in Windows 10. With this feature, windows can be tiled horizontally and vertically. Snap Assist feature works according to you choice. If you want, you can snap windows into new screen or tile.

HIDE METRO INTERFACE: It is not clear yet, has the Metro Interface been completely removed or not. Actually this is a better option for Hybrid, but while talking about Desktop, Microsoft has given a Check Box at its place in which 'Never Show Me The Metro Interface' option will be there.

EASY SHUTDOWN: Windows 8 users were waiting for an easy Shutdown feature. To Shutdown PC in Windows 8 users had to go to Charms firstly then Log off and then finally Shutdown. Now Windows 10 has given a much better Shutdown function. You will be able to see Shutdown option just by pressing alt+f4.

UNIVERSAL SEARCH: Universal Search function is given in Windows 10. This option works for both searching PC and Web. Now you don't have to go to browser for searching the net. If you have searched something in Search option of Start Menu, it will not only show the search results of the apps and files existing on your computer but also give search results from the internet. Microsoft's Universal Search is somewhat similar to Apple OS X.


You can Download ISO file for 32-bit and 64-bit version below: